There’s something deeply satisfying about turning simple potatoes into crispy, golden chips right in your oven. No oil splatters, no greasy kitchen smell—just that familiar, comforting aroma of baked potato goodness wafting through the house. It’s a nostalgic twist on a classic snack, perfect for when you want something crunchy but don’t want the fuss of deep-frying.
I started making these baked chips on a lazy Sunday, just to see if I could get that same satisfying crunch without the excess oil. Turns out, they come out crispier than I expected, with a lovely, savory edge that’s hard to beat. It’s a bit chaotic trying to get them perfectly thin, but once you find your groove, they become a regular snack in my kitchen.
What I love most is how adaptable they are—seasonings, thickness, even the type of potato. Plus, they’re quick enough to whip up when a snack attack hits, and they feel a little more wholesome than store-bought chips. This recipe is about reclaiming that crispy, salty joy while keeping it simple and real.
Focusing on the nostalgic joy of transforming humble potatoes into crispy, snackable chips in the oven, capturing that satisfying crunch and savory aroma without deep-frying.
The story behind this recipe
- This recipe sprouted from a lazy weekend experiment, when I was craving something crispy and satisfying but didn’t want to drag out the fryer. I remembered those old-school chips my grandma used to make—thin, salty, oven-baked—so I thought, why not give it a shot? The smell of baking potatoes, just a hint of toasted edge, took me straight back to childhood afternoons in her kitchen.
- Once I nailed that perfect thin slice and a good sprinkle of sea salt, I couldn’t stop munching. It became my go-to for movie nights and quick snacks—no fuss, no oil splatter, just a simple, honest crunch. Now, I keep a stash of these chips in the jar, reminding me that sometimes, the best snacks are the ones you make yourself with a little patience and a lot of love.
- heading
- story_type
Key ingredients and tips
- Potatoes: I favor starchy varieties like Russet for their crispiness, but you can try Yukon Gold for a creamier interior. Thin slices are key—use a mandoline for uniformity, and imagine that satisfying crackle when they hit the baking sheet.
- Olive oil: Just a light brush helps them crisp up without greasiness. Too much, and they feel oily; just enough, and they get that perfect, golden sheen and a subtle fruity aroma. Skip if you want to go oil-free, but expect a softer crunch.
- Sea salt: I like a good pinch of flaky sea salt—brings out that savory, salty punch in every bite. Too much salt can overpower; sprinkle lightly, then taste-test before baking the whole batch.
- Paprika or spices: A dash of smoked paprika or chili powder gives a smoky, warm note that elevates the simple flavor. Be sparing—these can burn quickly and turn bitter if overused. Mix into oil before coating the slices for even coverage.
- Optional herbs: Fresh thyme or rosemary can add a fragrant herbal lift. Chop finely and sprinkle after baking for a fresh pop, or toss with slices before baking for more infused flavor. Avoid overpowering the delicate crunch.
- Vinegar splash: A tiny drizzle of apple cider vinegar in the oil mixture adds a bright, tangy note that cuts through the richness. Use sparingly—just a teaspoon—so it doesn’t overpower the potato’s natural flavor.
- Cornstarch: A light dusting before baking helps achieve extra crispness. Think of it as a magic trick for crunch—don’t overdo, or they might feel powdery. Mix with seasoning and toss evenly.
Spotlight on key ingredients
Potatoes:
- I favor Russets for their starchy, crispy edges, but Yukon Golds can add a creamier texture. Thin slices crackle beautifully and ensure even baking.
- Olive oil: A light brush helps achieve that golden, crispy exterior without greasiness. Too much, and they feel oily; just enough, and they develop a lovely sheen and aroma.
Spices & Seasonings:
- Sea salt: Flaky sea salt brings a burst of savory flavor and a satisfying crunch, but be cautious—too much can overpower the delicate taste. Sprinkle lightly and taste-test before baking.
- Spices (like smoked paprika): A dash adds smoky warmth and elevates the simple potato flavor. Remember, spices can burn quickly—add sparingly and evenly for the best results.
Notes for ingredient swaps
- Potatoes: I prefer Russets for their starchy crispness, but Yukon Golds can work if you want a creamier bite. Thin slices are key—use a mandoline for best results.
- Olive oil: Just a light brush helps them crisp without feeling greasy. If you skip it, they’ll be less golden and slightly softer, but still tasty.
- Sea salt: I love flaky sea salt for that burst of flavor, but kosher salt is a fine substitute. Use less if your salt is coarser to avoid overpowering.
- Spices: Smoked paprika adds a smoky note, but cumin or chili powder can give a different kick. Keep it light—burnt spices turn bitter fast.
- Herbs: Fresh thyme or rosemary give a fragrant lift. Dried herbs work too, but add them after baking to keep their aroma vivid.
- Vinegar: A splash of apple cider vinegar brightens the flavor. Lemon juice can do the same, adding a fresh, citrus zing.
- Cornstarch: A dusting of cornstarch makes for extra crunch. If you don’t have it, a tiny bit of rice flour can mimic that crisping effect.
Equipment & Tools
- Mandoline or sharp knife: To slice potatoes uniformly thin for even baking.
- Baking sheet: To hold slices during baking and ensure even heat exposure.
- Parchment paper: Prevents sticking and makes cleanup easier.
- Mixing bowl: To toss slices with oil and seasonings evenly.
- Pastry brush: To lightly coat slices with oil, ensuring crispness without greasiness.
Step-by-step guide to baked potato chips
- Equipment & Tools: Gather a mandoline or sharp knife, baking sheet, parchment paper, mixing bowl, and a pastry brush. The mandoline ensures even slices, while parchment prevents sticking.
- Wash and peel 2 large Russet potatoes. Use a mandoline to slice them as thin as possible, about 1/16 inch. Keep slices in cold water to prevent browning.
- Drain potato slices and pat dry thoroughly with a clean towel. Excess moisture hampers crisping and can cause steaming.
- In a mixing bowl, toss slices with 1 tablespoon olive oil, ensuring each piece is lightly coated. Add a pinch of sea salt and optional spices like smoked paprika or chili powder for flavor.
- Preheat oven to 200°C (390°F). Line baking sheet with parchment paper. Arrange slices in a single layer, overlapping slightly but not stacking.
- Bake for 12-15 minutes. After 8 minutes, check the color; they should be just turning golden. Rotate sheet for even baking.
- Keep a close eye near the end—slices can go from perfect to burnt quickly. They should be crispy, slightly firm, and have a golden hue.
- Remove from oven and let rest for 2 minutes. Chips will firm up as they cool. Use a spatula to transfer to a wire rack if needed.
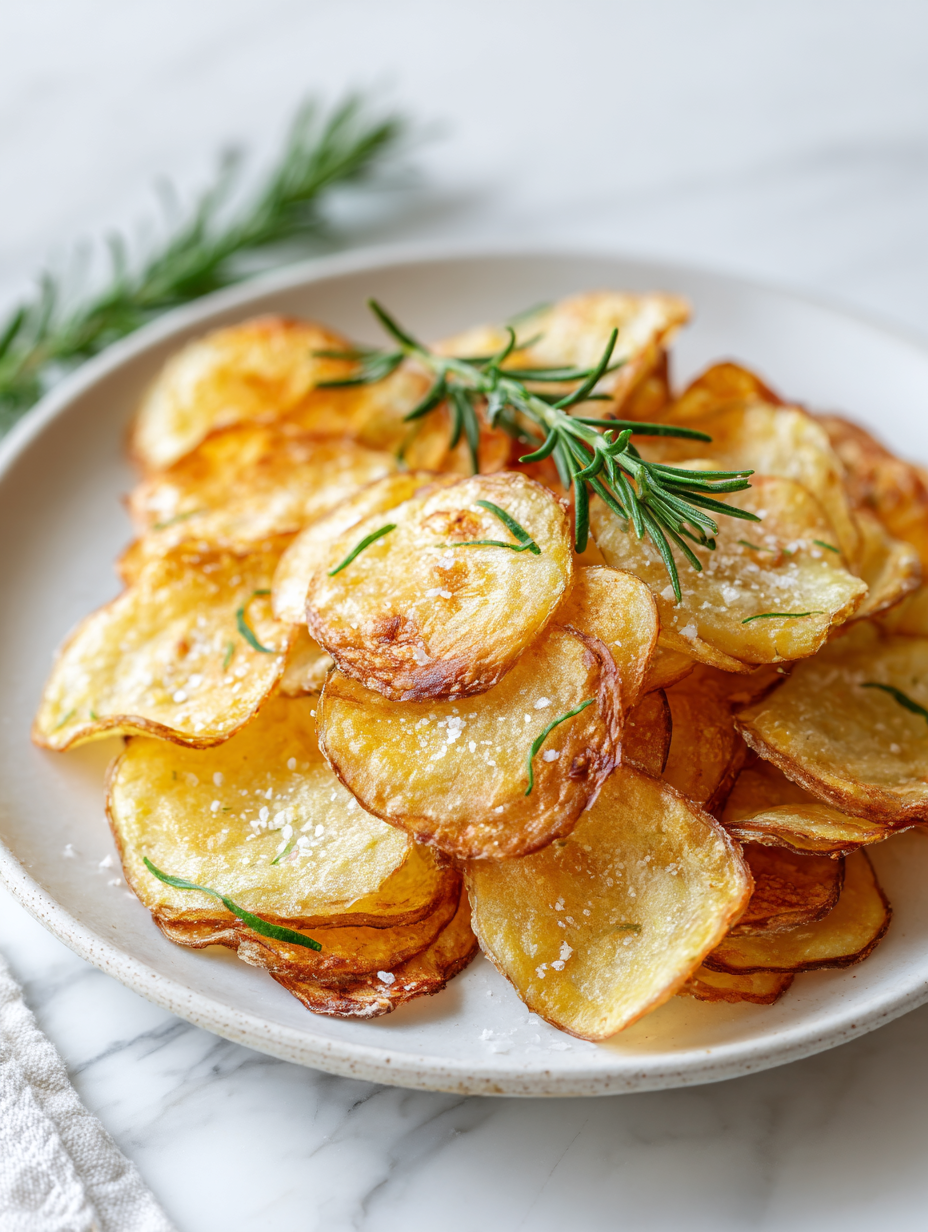
- Finishing & Plating: Serve immediately for maximum crunch. For presentation, sprinkle with a tiny pinch of sea salt or herbs if desired. They taste best warm, with that initial crackle in every bite.
- Checkpoints & How to Know It’s Done: Chips are crispy and golden-brown; they crackle when you bite; they’re not greasy or soggy. If they feel soft, bake a few minutes longer. If burnt, discard and try again.
Let the chips rest on a wire rack for 2 minutes to firm up before serving. Serve warm for the best crunch, and sprinkle with extra sea salt or herbs if desired. Enjoy immediately, as they lose crispness over time.
How to Know It’s Done
- Color: Chips should be golden and evenly browned.
- Texture: Feel crispy but not brittle, with a satisfying crunch.
- Appearance: Slight puffiness indicates proper dehydration and crisping.
Oven-Baked Potato Chips
Ingredients
Equipment
Method
- Use a mandoline or sharp knife to slice the potatoes as thinly and evenly as possible, about 1/16 inch thick. Place the slices in a bowl of cold water to prevent browning.
- Drain the potato slices and pat them completely dry with a clean towel to remove excess moisture, which helps them crisp during baking.
- Transfer the dry slices to a mixing bowl and lightly toss them with olive oil, ensuring each piece gets a thin, even coating. Sprinkle with a pinch of sea salt and smoked paprika if using.
- Preheat your oven to 200°C (390°F). Line a baking sheet with parchment paper to prevent sticking and make cleanup easier.
- Arrange the potato slices in a single layer on the prepared baking sheet, making sure they don’t overlap or stack too much, which could prevent crisping.
- Bake for 12-15 minutes, checking at the 10-minute mark. The chips should turn golden brown and become crispy, with bubbling edges. Rotate the baking sheet halfway through for even baking.
- Once golden and crispy, remove the chips from the oven and let them rest for 2 minutes to firm up further. They will continue to crisp as they cool slightly.
- Transfer the baked chips to a wire rack or serve directly from the baking sheet. Sprinkle with a little extra sea salt or fresh herbs if desired, while still warm for best flavor.
Notes
Pro tips for perfect baked chips
- Bolded mini-head: Thin slices are crucial → Use a mandoline for uniform, crispy chips that bake evenly.
- Bolded mini-head: Don’t overcrowd the pan → Arrange slices in a single layer for maximum crispness and even heat exposure.
- Bolded mini-head: Keep an eye on baking time → Chips can go from perfect to burnt quickly; start checking at 10 minutes.
- Bolded mini-head: Use a light oil coating → Brush slices lightly with oil to achieve a golden, crispy exterior without greasiness.
- Bolded mini-head: Rest before serving → Let chips cool on a wire rack for a few minutes to firm up and maximize crunch.
- Bolded mini-head: Season immediately after baking → Sprinkle with extra salt or herbs while still warm to enhance flavor adhesion.
- Bolded mini-head: Store in an airtight container → Keep chips crisp for a day or two; reheat in oven for a fresh crunch.
Common mistakes and how to fix them
- FORGOT to evenly slice? Use a mandoline for consistent thickness and crispness.
- DUMPED excess oil? Lightly brush with oil to avoid greasy chips and ensure crunch.
- OVER-TORCHED chips? Lower oven temperature or check early; burnt chips taste bitter.
- MISSED drying slices? Pat thoroughly to prevent steaming and soggy chips during baking.
Quick fixes and pantry swaps
- When chips turn soggy, splash with a little more oil and bake for 2 more minutes.
- If slices stick together, patch with parchment paper and separate gently before baking.
- Overly greasy chips? Shake off excess oil before baking or reduce oil quantity in the toss.
- DUMPED in too much salt? Rinse lightly with cold water and pat dry, then re-season after baking.
- When chips are unevenly baked, rotate the baking sheet halfway through for uniform crispness.
Prep, store, and reheat tips
- Prep potato slices ahead: Wash, peel, and thinly slice potatoes a day in advance. Store in cold water to keep them crisp and prevent browning, then drain and dry thoroughly before baking.
- Store baked chips: Once cooled completely, keep in an airtight container at room temperature for up to 2 days. For longer storage, freeze in a single layer, then transfer to a zip-top bag and keep for up to a month.
- Shelf life: Freshly baked chips are best enjoyed within 24-48 hours for maximum crunch. After that, they may soften but can still be reheated or crisped up.
- Reheating tips: Reheat in a 180°C (350°F) oven for 3-5 minutes until they crackle again. For quick reheats, use a toaster oven or air fryer, watching closely to avoid burning. Expect a slight loss of crispness but still satisfying.
Top questions about baked potato chips
1. How thin should I slice the potatoes?
Use a mandoline or a sharp knife to get uniformly thin slices, about 1/16 inch thick, for crispy results.
2. Do I need to dry the potato slices?
Pat the potato slices completely dry before baking to ensure they crisp up and don’t steam in the oven.
3. What’s the right baking temperature and time?
Bake at 200°C (390°F) for 12-15 minutes, checking around the 10-minute mark to prevent burning.
4. How do I know when the chips are done?
If chips are soft or soggy, bake a few more minutes until they turn golden and crackle when you bite into them.
5. Can I make these oil-free?
Use light oil to coat the slices—just enough to help them crisp without feeling greasy or oily.
6. How should I store baked potato chips?
Store cooled chips in an airtight container at room temperature for up to 2 days for best crunch.
7. Can I re-crisp leftovers?
Reheat in a 180°C (350°F) oven for 3-5 minutes to regain crispness. They might soften if left too long.
8. When should I add extra seasoning?
Adjust seasoning after baking if you want a more intense flavor; sprinkle extra salt or herbs while warm.
9. What spices go well with baked chips?
For a smoky flavor, use smoked paprika or chili powder, but add sparingly to avoid bitterness or burning.
10. Any tips for even baking?
Thin slices and even spacing on the baking sheet are key to achieving maximum crunch and uniform color.
These baked potato chips remind me that simple ingredients can create something truly satisfying. The smell of the oven, the crackle of each bite, it all takes me back to cozy afternoons and lazy weekends. It’s a small act of homemade joy, easy to repeat and hard to forget.
Whenever I crave a crunchy snack, I turn to this recipe. It’s honest, straightforward, and just imperfect enough to feel real. No matter the season, they’re a reminder that good food doesn’t need to be complicated or deep-fried—just a little patience and a lot of love.